Showing posts with label house stuff. Show all posts

Tuesday, April 17, 2012

Apothecary Jar Terrarium

This last summer I read a post of the Nester about Apothecary Jar Terrariums.  I knew instantly that come spring I was SOOO going to make one.

So this late winter/spring I started gathering the supplies.

Here is what I got:

-Rocks

-Carbon (I got mine in the fish supply aisle at Wal-mart)

-Dirt

- Low light plants (I bought way more than would fit in my jar)

-The biggest apothecary jar that I could find.  (I got mind at Michaels with a coupon)


Here is what I did:

I put the carbon in a strainer with some small holes and rinsed it out in the sink.  It will start to run clean after a few seconds.  I set that aside for a minute to fully drain.

I placed a layer of rocks in the bottom of the jar, I used regular drainage rocks that I had from a different project but I think that smaller river rocks would really look great. 

 On top of the rocks goes a layer of the rinsed carbon.  The carbon helps keep the water from becoming yucky and stagnate. 

Then I layered the dirt.  I actually put too much in so I had to scoop some out, which kinda made the sides of my jar messy.  So try and add a little at a time.

Next came my plants.  I intended to have three different plants of varying heights and textures...but apparently my jar wasn't as big as I thought.  I could only fit one of the plants that I bought.  A mini fern, it is cute but I wish that I could have fit more.  Alas what is a girl to do?!

Then I added some rocks.  I wanted to add some cool moss, but I honestly have no idea where to get that in my neck of the woods.  So I am going to have to work on that.

So then I basically just added water, maybe a cup and a half.  As I was adding the water I let it stream down the side to try and get the rouge dirt off the sides, that worked pretty good but not perfect.  That is okay thought I can live with not quite perfect!

I am sure that I must have made a terrarium in school but I don't remember it, so I guess it doesn't count.  YAY!  I made my first terrarium!


I am enjoying it a lot, I just wish I had some moss.  Sigh!  I think that this plant has a fighting chance of me not killing it...as it is going to water itself.  Bonus

Now I keep thinking about all of the other containers that I could turn into a terrarium. 

How  about you, have you been busy with any "gardening" lately?  Made a terrarium lately?  Tell me all about it!

Sunny

Wednesday, February 29, 2012

Bathroom Update!!

Hello world...I am back!!!  And I am so excited to be rejoining the  cyber world.  I think that I actually have a headache from blog/pinterest withdrawl. :)

I am a little ashamed to tell you that I didn't make it as far as I thought that I would on the basement bathroom.

I don't know if you watch Jersey Shore or not but they have a saying on that show that is something along the lines on "time to G.T.L" which stands for Gym. Tan. Laundry.  well around my world it is Gym. Dishes. Laundry.   So I have been very busy with the usual mom stuff, time spent at the gym, and cleaning...unfortunately that hasn't left a great deal of time for the bathroom.  Plus I am not sure exactly how I feel about it so I am living with it for a while.  I may need to make some tweaks. 
The good news is that the Hubs likes it... so that is step number one!!

This is what I am ultimately wanting.

 I started by selecting an Eddie Bauer color from Lowe's called Labrador.  I thought that I had asked for the paint plus primer...but when I went back to pick it up it was just regular Valspar paint.  I didn't want to make a big fuss so I took it.  The problem being that when you tint paint so dark it really lowers its coverage abilities.  BOO!  So I had to do two (in some places three) coats.  That includes cutting in...so it took a while.  But I LOVE the color.  When I originally painted it brown I really knew that it should have been dark chocolate but I got scare to go so dark so I wimped out and went with a watered down milk chocolate and I was never happy with it.  It looked horrible with the wood work and was just a bad choice...the good news is that I finally have the right brown and it looks soooooo good!  Yay!
Don't you just love it?  Well I do!!!


Yes!!  I do believe in child labor.  Actually there is something about painting that children are fascinated with...my boys are like a moth to a flame.  I wish I shared their enthusiasm!!!
After I got done with the brown I got out some of my artist brushes and some off white paint plus primer and painted a few trees.  I think that for this step it is super important that you use paint plus primer, just for the coverage needs.  Especially white over brown, you wouldn't want to have to go over the lines several times.

At first I was unsure how I felt about it so I have been giving it a few days to marinate, I think that I like it so I think that I will continue.  I know that I said that I was going to stencil the trees, but I never found a stencil that I loved.  Plus the ones that were decent were a lot of $$$$.  So since I have experience with painting I thought that I would just save my money and try it myself.  I figured that if I couldn't pull it off I could always paint over it and order a stencil.  But now that I have tried it I am glad that I choose not to get a stencil.

So what do you think?  Have you done any wall muralling?  If so I would love to hear about it.  Am I the only one who is so excited about "springing up" the house.  I think that we are going to get a whole new spring/summer look!!!

Wednesday, February 15, 2012

I Am SOOOO Excited.

So my kids and I are off from school for the next two days...AND...Monday is Presidents day...SO...if you are doing the math, that equals 5 days off.

Can I just say HOLLA!!!!

So you will have to tune in over the next few days because Operation Birch Bathroom commences tomorrow.  YAY!

I am just so excited that I am finally getting some time to play in a little paint.

So tell me, what kind of projects are you working on?  Are you looking forward to enjoying a long weekend?  Have you ever stenciled?

I have to admit that I am a little nervous...wish me luck.

Sunny

Tuesday, February 14, 2012

Not Exactly What I Was Thinking...

So do you remember the other day when I was whining about discussing my mantel and how I didn't know what to do with it in this in between season?  


Well this last weekend my Hubby did a little redecorating of the fireplace...and I am not sure that this is what I had in mind for the mantel...


Hmmm....Now I really don't know how to decorate the mantel.  This guy is named Steve, and we just got him back from the taxidermist on Saturday.  He is my husbands trophy from 2010. 


I am happy that my husband is so happy, but Steve doesn't quite fill up the space...not to mention that it kinda lends toward a lodge look in my house (not exactly my thing).  This is not Steves final resting place, he really lives in the man cave in the basement so in a few weeks he will be leaving.  But the Husband is so proud that he just wanted to display him prominently for a while.  Meanwhile, I just cannot help but chuckle to myself.  I guess it is a small thing to make the Hubs happy...right!?!

Have you ever had to make any design sacrifices for the significant other?  Are there any animal heads prominently displayed in your living room?  Are you a fan of taxidermy? 

Have a great day!!

Sunny.

Thursday, January 26, 2012

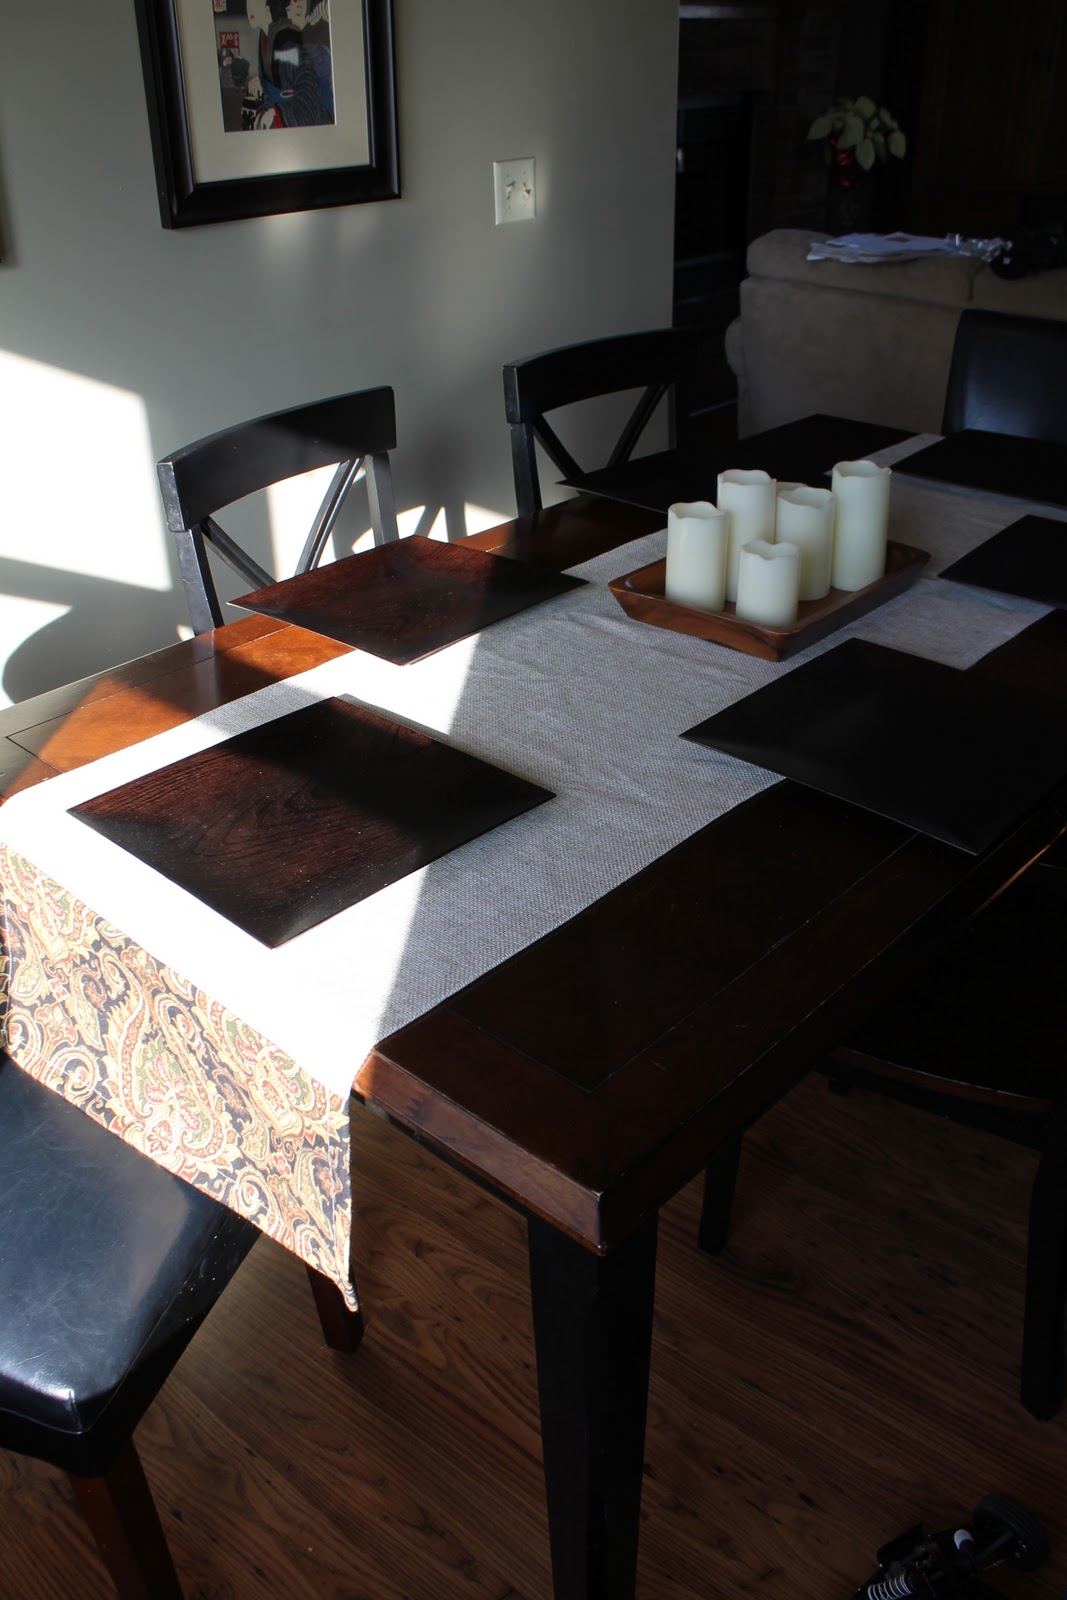
$5 Table Runner

I have been down for the count the past couple of days with a cold, but before that happened I had planned to share my new table runner.

I find this weird season between Christmas and Spring is a little difficult time to decorate.  Everything feels cold...probably because it is dark and cold outside. 

So after Christmas I wanted to find a new table runner.  The problem; because there just always has to be a problem, is that standard table runners that I find are just too dinky.  They are neither long nor wide enough.  I have only found one ready made runner that has been the dimensions that I wanted and that was from Pottery Barn...which is three hours away, and usually not in the budget.  So I find my self making my own.

So here is what I did:

First I went bargain shopping and found a curtain panel on clearance that had the look of burlap.  The nice thing about making a runner out of a curtain panel is that it is plenty long enough and wide enough to make two table runners.  The bonus of this particular panel was that it was only $10, (originally $40, woot woot) and like I said I have enough to make another table runner too. 


I cut off the existing hems and the top, I could have saved some fabric and used a seam ripper...but I hate ripping out seams it makes me want to rip out my hair.  So it was just worth it to me to just cut them off.  Then I simple cut the panel in half lengthwise.  This took some time to make sure that I was cutting straight and exactly in half but overall pretty painless.

So I had a small amount of fabric left over from making some throw pillows and I added it too the ends of the curtain panel runner.


 I used a simple straight stitch and hemmed all the way around.  Ran an iron over it, and Voila!!  Table runner that coordinates with my living room!  Yay.


The only thing left that I need was some new chargers. I find that if I use chargers then my boys have less of a chance to muck my runner all up.  I like plastic ones so that I can easily clean them like 37 times a day.  By the way little boys are messy.

I found these awesome faux bois plastic chargers at Pier One.  They are rocking my world.

I really like how it all turned out.  Not too fussy just right, I kinda need less fuss after the Christmas storm blows through my house.

So what are you up to?  Got any simple sewing projects going on?  This one was sooo easy I literally completed it from start to finish in the time it took the hubs to cook dinner...HOLLA!

Sunny

I posted this to:

Thursday, January 19, 2012

I want to stencil...

I have two bathrooms that I have been dying to change.  Well actually I have been dying to change all three of the bathrooms in my house.  All three are on the to-do list for this year, but I only want to stencil in two of them.  Okay... the actual number of bathrooms that get stenciled ultimately depends on the ease or difficulty of the process.  I may find that I love the monotonous work of stencilling in which case they may all get it, then again I may find that I hate and stop immediately and paint over it.  Nevertheless I have big ideas.

I think that I want to start in the basement bathroom.  This room is also the laundry room and crafting room.  The fact that I primarily craft in there is kind of funny because really there is no work space and no supplies in there, but I always find my self working in there on top of the dryer(?) so I really want it to look great.


I told the husband that I wanted to redo the laundry room and I got that "seriously!" look, so I don't know if he is going to love this or not (actually I know that he won't but he pretty much let me do what I want).  The reason that he doesn't want me to mess with the laundry room is because I have repainted that room like 3 time and I have changed the flooring once.  But the flooring needed to go, we had ugly blue berber carpet....in a bathroom...and a laundry room...who does that?  We replaced it with tile that I still love.  I picked a light brown that really looked nice with the tile but when I got it up it made the trim look horrible.  I wanted to paint the trim but my husband said "no, you can't paint wood".  Why do men say this?  I mean it is wood...its not like I want to paint over 24 karat gold.  Whatever.  I needed to find a happy median that we could both be happy with.

So here is my plan:
I plan to go dark chocolate brown. 


I know that it seems like that will make my laundry room look like a cave but I think that in the end I will add enough light accents that the light/dark ration will really work well.
                                                                      source
Then once the walls are deep chocolate brown I want to add a stencil on top just to make it a little more graphic and cool!
This is what I had in mind:

This is actually wallpaper...but it is like $200 a roll...and...that isn't happening!  So I have found some stencils that replicate this look, and they are only $60.

                                                                             source
I think that it would look really cool and graphic if the back ground was choc brown and the trees were off white.  What do you think?

I also saw where a professional faux painter hand painted one, and that looks really great too.

                                                                         source
I have a lot of experience painting, so I totally think that I could pull this off.  The question is how long would it take?  I don't want this to turn into a long drawn out process....so?


I also saw where another blogger had done some in her bedroom using an overhead projector...that is an idea!
                                                                       source
So that is kind of the short term plan for my basement bathroom/laundry room...what do you think?
Have you ever stenciled?  Do you like the idea of trees on the wall, or is it done already?  Are you contemplating a bathroom remodel? 

Have a great Friday!!

Sunny

Thursday, January 12, 2012

Home Goals 2012

So I am not much for making "Goals" for my home.  I am kind of a fly by the seat of my pants kinda girl, but the Nester is having a Home Goals link party so I thought that I would throw together a list of things that I would really like to do this year.  (Disclaimer: This list is by no means all inclusive of the things that I will actually do, inversely this list may not be realistic as far as what I can actually accomplish.)

1.  I would like to redecorate/renovate all the bathrooms in my house.  We are talking 3 of them so now is a good time to refer to the disclaimer if you missed it!.
My master bathroom will take the most time and money, but it REALLY needs it.  We have carpet in the bathroom......UGH!  I know so gross...Don't judge me!!  I didn't do it, it was like that when I bought it.  Though I have lived here a while and haven't changed it.  But I have been having/raising babies and it was not high enough on the priority list.  Maybe this is the year.  Who puts carpet in the bathroom?  GROSS!!

2.  I want to get this house organized.  DUH!  Doesn't everyone have this on their list?  Pretty sure they do.   I am no exception.  To my defense, my house has like NO storage.  Aside from the attic(which is like a giant pain in the booty) and a couple of small closets I got nothin'.  So this year I want to figure it out and make it look nicer, and make it function better.

3.  Here is the big one.  I have to get all new siding done on the house.  OUCH!!  The estimate is around $21,000 I don't know about you but I don't just have that laying around.  So that is going to be big!  The good news is that I get to have the whole house repainted!!  Yay for new paint colors.  And finally I get to repaint the front door a cuter color.  It is currently blue....not my bag but whatever.

There are a few other things that I would like to accomplish, and obviously little crafty awesomeness!  But I am actually getting a little overwhelmed now looking at the task list in black and white.  Moving on!  Pictures!

                                                 Basement bathroom/laundry room.


                                   Master Bathroom...Don't judge me!!  This is real life.
                                   Boys bathroom...just needs to look cleaner, even if it is not!
                                   
She needs new siding and a paint job.
                                                   New paint for the front door too!

Again don't  judge...  sometimes a girl just has to make it "work".  I said I needed to work on it!

So there you have it, a short list of some of the goals for the year.  But who knows what will actually happen?  Thanks for looking!

Sunny

I am linking up with the the Nesters 2012 Home Goals Party.

Monday, January 9, 2012

I got mantel issues...

I have lived in this house almost 8 years and aside from during Christmas I am never happy with my mantel.
I like having a mantel but it has a few issues.  The biggest issue is scale.  My fireplace is HUGE.  The ledge of the mantel is taller than I am,  I am 5'7" so I am not a tiny girl.  This is a problem because most things that I try and put up there seem too dinky, they just get eaten up by the enormity of the fireplace.

The second problem is that the ceiling in my living room is vaulted.  Which is actually great because it makes my living space feel so much bigger than it really is.  The problem is that the ceiling peaks offset to the center of the fireplace.  Which probably wouldn't bother anybody but me, but I like things symetrical.  I got issues!  Anyhow I am determined to love my house and that includes my mantel.  So I started to scour the internets looking for inspiration.  It turns out that I am not the only one that doesn't know what to do with my mantel.  The majority of pictures were of Christmas mantel, but very few decorated non seasonal mantels. 
                                                                       source
I like this mantel.  I like the varying heights of the frames.  This may help to balance out the length of the mantel and the wonky shape of the roof line.  Yes wonky is a technical term.  I also like that little arty objects are tucked in amongst the frames.  One of the problems that I have been having is that normal sized objects get dwarfed by the wall expanse behind and the ginormousness of the fireplace, this would make a normal sized object work.

The problem with this is that I can see this sort of arrangement costing a lot.  Frames and art are not cheap, especially larger pieces.  "Sorry Kids, you can't eat this month...mommy is redecorating!"

I could alway leave the mantel blank with just a mirror on the wall.  This arrangement I saw a lot of when I was inspiration surfing.  However, I hate this look for my house because it looks like I am just trying to ignore the fact that I have a fireplace or mantel all together.  Lets face it my fireplace is 6' tall and 8' long there is no ignoring that baby!

                                                                         source
Don't all of the tiny objects pilied on this mantel look a little silly?  I love the mantel but this is not the look that I am going for.

I want to avoid having my mantel look like a piling of crap that just looks cluttery.  Then again I don't like sparse either.  So I am going to have to come up with a solution.
                                                             The Lettered Cottage
I love the mantels that Layla at the Lettered Cottage creates from thrift store finds.  I think that I will take a few pages from her play book this spring, but I kinda need something for now.  Plus it is hard for me to find things at thrift stores that have the scale to stand up to my fireplace. 

                                                                       source
Maybe something like this would work.  A couple of potted plants on one side of the mantel, being balanced by a taller potted plant on the opposite side of the hearth.  That looks good and not too overdone. 

Maybe what I really need to do is stop trying to force it and just see what happens.  Sometimes I just need to relax and let inspiration come to me.

I will keep thinking about it.  When I figure it out you will be the first to know, well after the people who live here.  Thanks for visiting, if you have any suggestions or beautiful inspiration...don't be shy!!  Feel free to share!

Sunday, October 16, 2011

Ugly dresser turns CUTE

This is a story of doubt, regret, blood, sweat and tears.

 If you didn't know I have three boys.  I live in a 3 bedroom house.  This means that at any given time 2 of my boys have to share a room.  This has occured in a couple of different configurations, but this summer my oldest moved into his own room.  In the past my two older boys shared a room and in that room was 2 dressers.  The youngest was in a room by himself and since he had little clothes I just folded them and put them on a shelf in the closet.  When my oldest moved into that room the shelves were not going to work, so he needed a dresser.  Now pre-blog reading I would have thought that I had to spend like a thousand dollars on a good dresser.  Now I know that I have the ability to do things, cool things.

One day after dropping the older boys off at school,  the little one and I stopped off at an estate sale.  Believe it or not I had never been to an estate sale before.  The boy and I ventured around the house looking for treasure and I was about to give up, then in the basement there it was.

The ugliest dresser I had ever seen.  But is had dove tails all the way around the drawers and it was solid.  I knew that it would hold up to my 7 year old.  Price $17 and it was going home with me!!

Now I have to tell you that I did this project in August in southern Kansas, in the hottest summer in 31 years.  This is where the sweat comes into the story.


Yes the temperature says 110 degrees!! Nothing will stand in my DIY way.

So I drug the blue dresser to the back yard and began sanding...and sanding...and when I got tired I made the 2 year old sand.

Not really,  he just wanted a turn (because doesn't it look fun?)  Trust me his help lasted as long as it took to take this picture.


Remember the dresser drawers in this picture it will lead to the tears portion of the tutorial.

So when I got it sanded to a point that I was happy with the smoothness I painted it with a black tinted primer.  I don't have pictures of that because I was so hot I was delirious and forgot.  I left them outside to dry that night.  The next morning I headed out back to begin the painting process, at 8:30 am it was a balmy 91 degrees and too hot to paint outside.  My husband was out of town with the military and I had no help getting the dresser in the house.  However the desire to get back into the air conditioning was enough to grant me super human strength and I carried it in by myself. 

Inside I gave it 2 coats of Tuxedo Tie an Eddie Bauer color from Lowes sanding in between coats.  Again no pictures (at this point I just wanted it done and to take a nap).

I didn't want to just have a plain dresser, and I love when things have letters or numbers on them so I decided to add some numbers to the dresser drawers.

 I printed out numbers in a font and size that I liked onto card stock.  I cut out the numbers and made a stencil.  I took a pencil and traced the numbers onto the dresser drawers.  Then I took some cream colored paint and hand painted the numbers onto to the drawers in "order". 

When that was done I gave the whole thing a gazillion coatsof Polyrcyllic, sanding in between coats.  Apparently it is supposed to be better over paint than polyurethane.  Discoloration.  I didn't love the Polycryllic.  I was using a foam roller and it left like a million bubbles that left the surface bumpy when it dried.  Maybe it was user error but whatever I tried nothing fixed the problem.

I love the way that it turned out.  Are you ready for the tears portion?  I thought that I had kept the drawers in order...but at some point the top right and bottom right got switched.  The numbers were supposed to read 03 23 04 my sons birthday.  Oops!!  Someday when the hurt goes away I will sand off the numbers, repaint, and renumber in the right order, it still just hurts too much. 

My husband got regular updates on the "dresser" by phone.  I found out later that he had serious doubts about how cool it would be, but now he totally loves it.


My regret:  I wasted so much time thinking that I had to spend a bunch of money to get my son a cool dresser that would last!!

Hope you enjoyed visiting!!  Feel free to leave a comment...I promise to read them in the right order :) 

Sunny
I am linking to these:
The DIY Show Off Primitive & Proper Piece of Work Wednesday